
Importing Documents
Quick 4 minute overview
Accessing the Bulk Document Importer Tool
To get started adding Documents to the transactions you've already uploaded - you have two options to get to the Document Import wizard:
-
From the Filings Import Log:
Connect Users
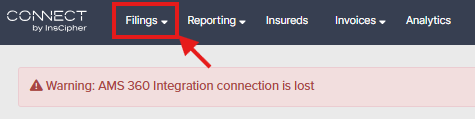
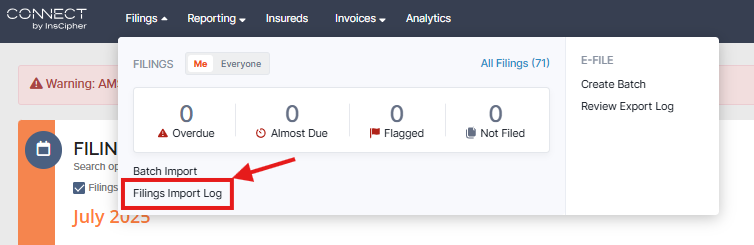
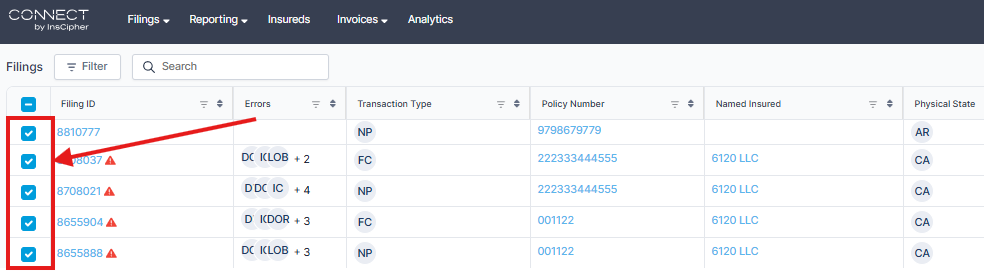
Start by selecting Filings at the top left of the Connect portal.
After clicking on this tab, you should see an option for Filings Import Log.
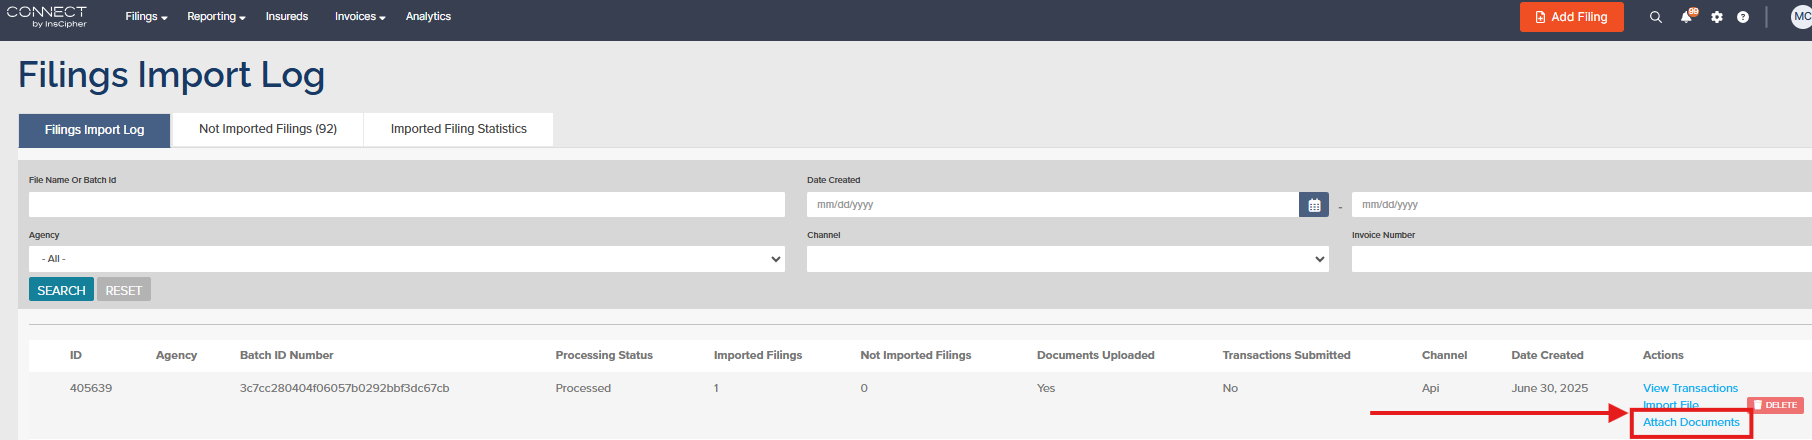
On the Filings Import , find the relevant batch to attach policy documents to. Then click on the "Attach Documents" action button to add Documents.
-
From the Filing List Page:
Connect Users
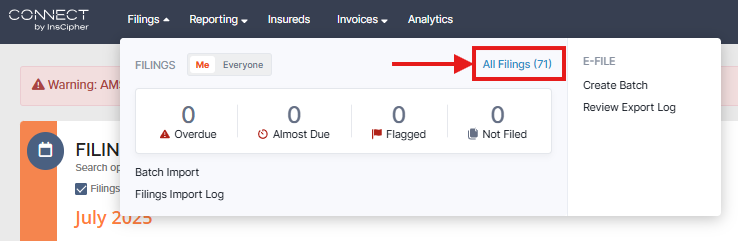
Start by selecting Filings at the top left of the Connect portal.
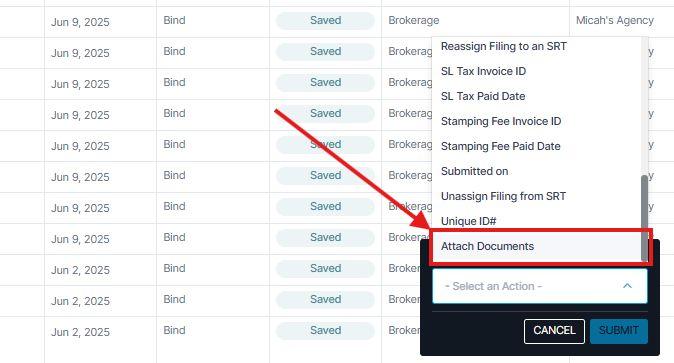
Select All Filings
On the Filings list page, select one or more transactions:
You will notice a dialog box appear in the bottom right showing 'x number' of items selected. Click the -Select an Action- dropdown and scroll to the bottom. There, you'll find an option called Attach Documents. Click it, and then click SUBMIT.
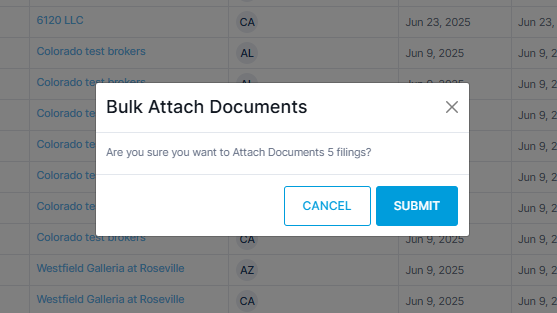
You will be asked to confirm your selection to start the bulk document attachment process (you can click SUBMIT again here from the dialog modal that appears).
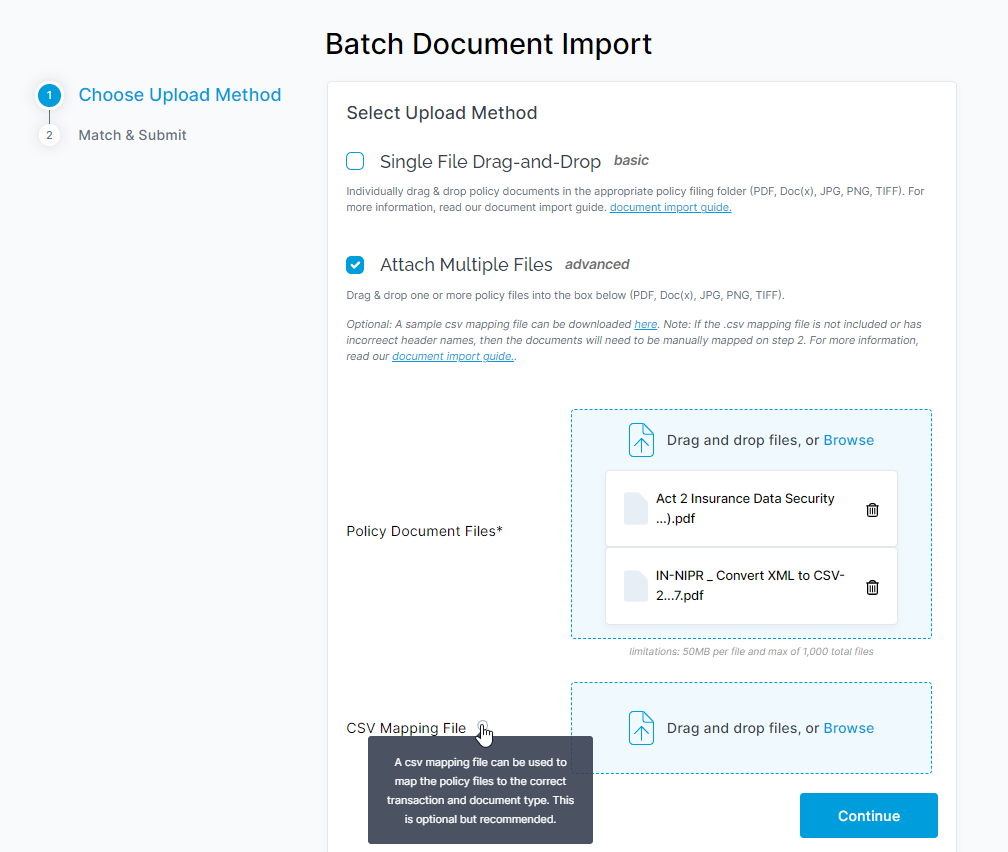
Step 1: Choosing Your Document Upload Method
Welcome to the Document Importer tool UI!
To start, you'll need to select whether you are uploading Multiple Files at Once or would like to upload One File at a time. You can see use-cases which explain some of the reasons why you may want to use one over the other in each selection card
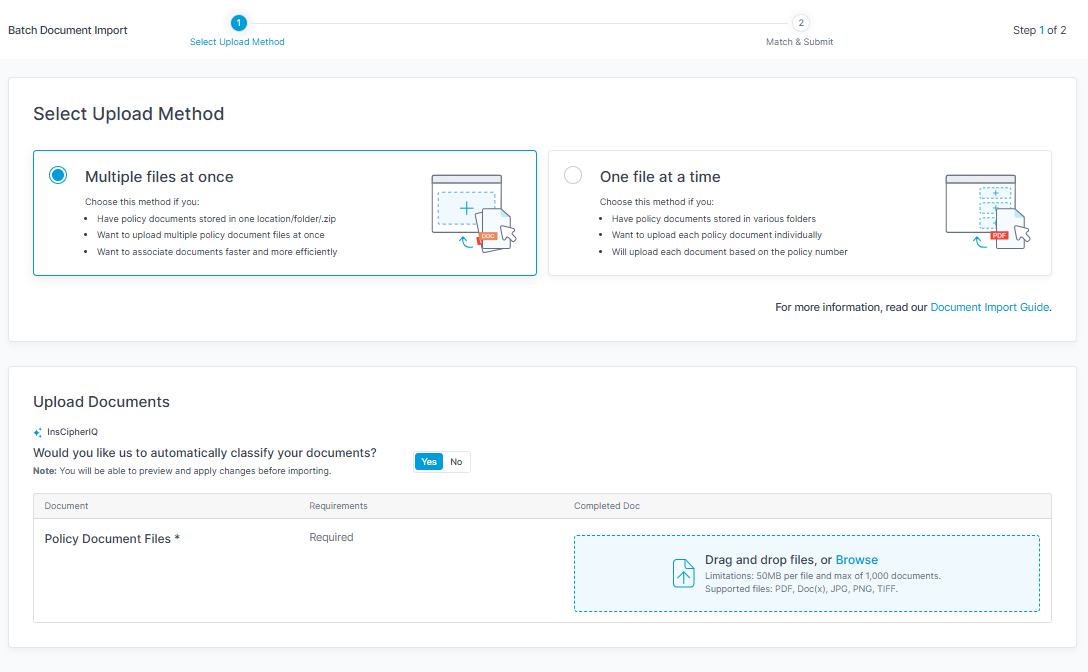
To start, you'll need to select whether you are uploading Multiple Files at Once or would like to upload One File at a time. You can see use-cases which explain some of the reasons why you may want to use one over the other in each selection card. But to summarize this a bit, please read more below:
| Method of Upload | Advantages / Use-cases |
|---|---|
| One file at a time (or 'single file drag-and-drop') | This approach allows you to have a list of filings on the left side and drag and drop policy documents on the right. |
| Multiple files at once | This approach allows you to attach all your documents at once, and either through a .csv mapping file or through manual effort, map the documents to the appropriate policy transaction and document type. |
Step 2: Match & Submit
Single File Drag-and-Drop Method
Should you choose this method in Step 1 and click Continue, you will be taken to Step 2 where you will attach your documents one at a time. .

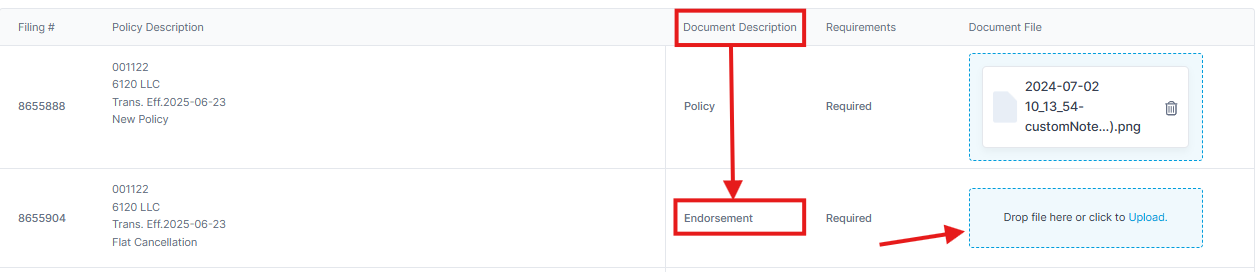
You will be presented filings / transactions that have a document requirement that has not yet been fulfilled - such as from the line item below. Specifically, in the column Document Description the system outlines which required document is currently missing and needs to be uploaded. You are encouraged to drag and drop or open up from your computer the required document to meet this requirement.
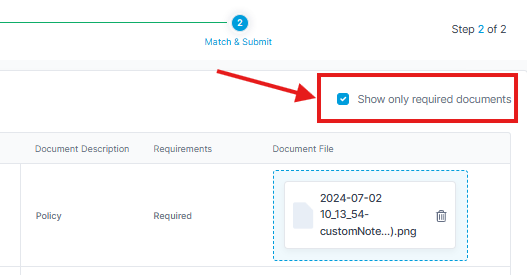
Show only required documents toggle: You have the option of showing only transactions that have required documents that need to be fulfilled, or to show all transactions regardless of whether they need a document or not. This can be configured with the Show only required documents toggle at the top right. This is ON by default:
Proceed without attaching all required documents toggle: You additionally have the option of proceeding with mapping the documents to the transactions without having met all requirements for documents to be uploaded from the Requirements column. Simply toggle ON the Proceed without attaching all required documents toggle, and you'll see the Finalize Document Mapping button turn blue, allowing you to proceed and map the documents you want.
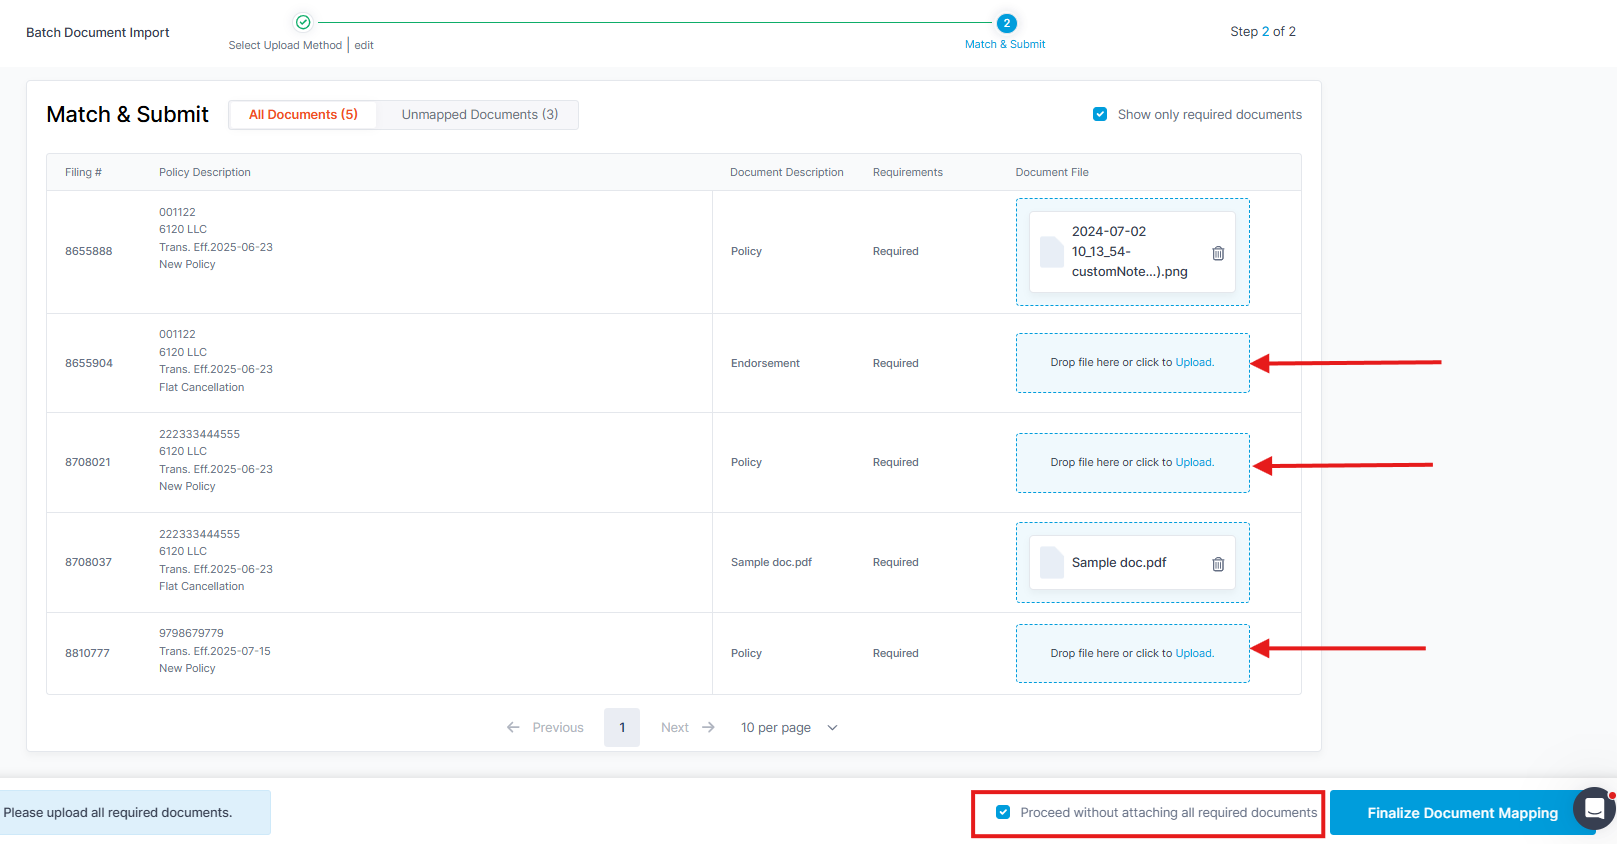
In this example, we can see that the user did not attach all of the required documents before proceeding. However, they utilized the toggle at the bottom to move ahead and map what they needed to.
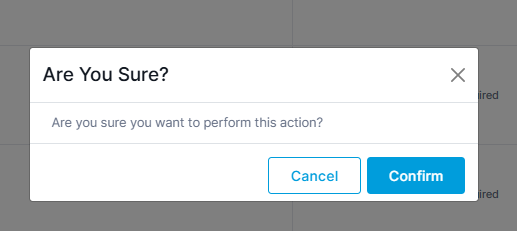
Once you are ready to map (attach) all of the documents you've uploaded, it's time to click Finalize Document Mapping button. You will be greeted by a confirmation message asking you if you'd like to proceed and perform the action. You can click Confirm if you are ready to map the documents.
From there, you will be redirected back to the page you were on before the Document Import wizard. For example, if you'd started by selecting filings on the Filing List View, you'd be redirected back there. If you'd started by attaching documents in the Filing Import Log, you'd be routed to that page.
TIPS:
- Consider having two windows open. One with the document importer and the other with your Windows Explorer open. Drag and drop the appropriate policy documents into the correct filing folder.
- By default, only "Required documents" appear. However, you can attach optional documents, if you choose to do so, by unchecking the checkbox on the top right corner:
- You can choose to proceed without attaching documents. If you do so, you can always come back later and attach any missing documents that remain.
Multiple files at once
Note:There is currently a limit of 500 transactions that can have documents bulk attached.
In this workflow, you will bulk attach documents - and have the ability to choose between:
- Manually mapping your uploaded documents to filings / transactions using a CSV file.
- Having InsCipher map your uploaded documents to filings / transactions for you.
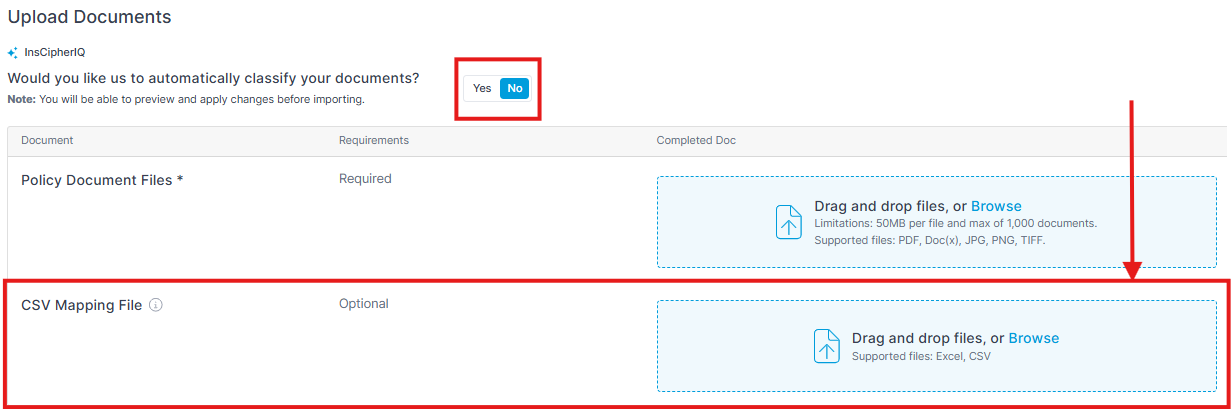
In the Upload Documents section below, you will see a toggle for the question Would you like us to automatically classify your documents?
Choose No for option 1 above - but you will need to provide a CSV file that outlines the mapping.
Choose Yes for option 2 above
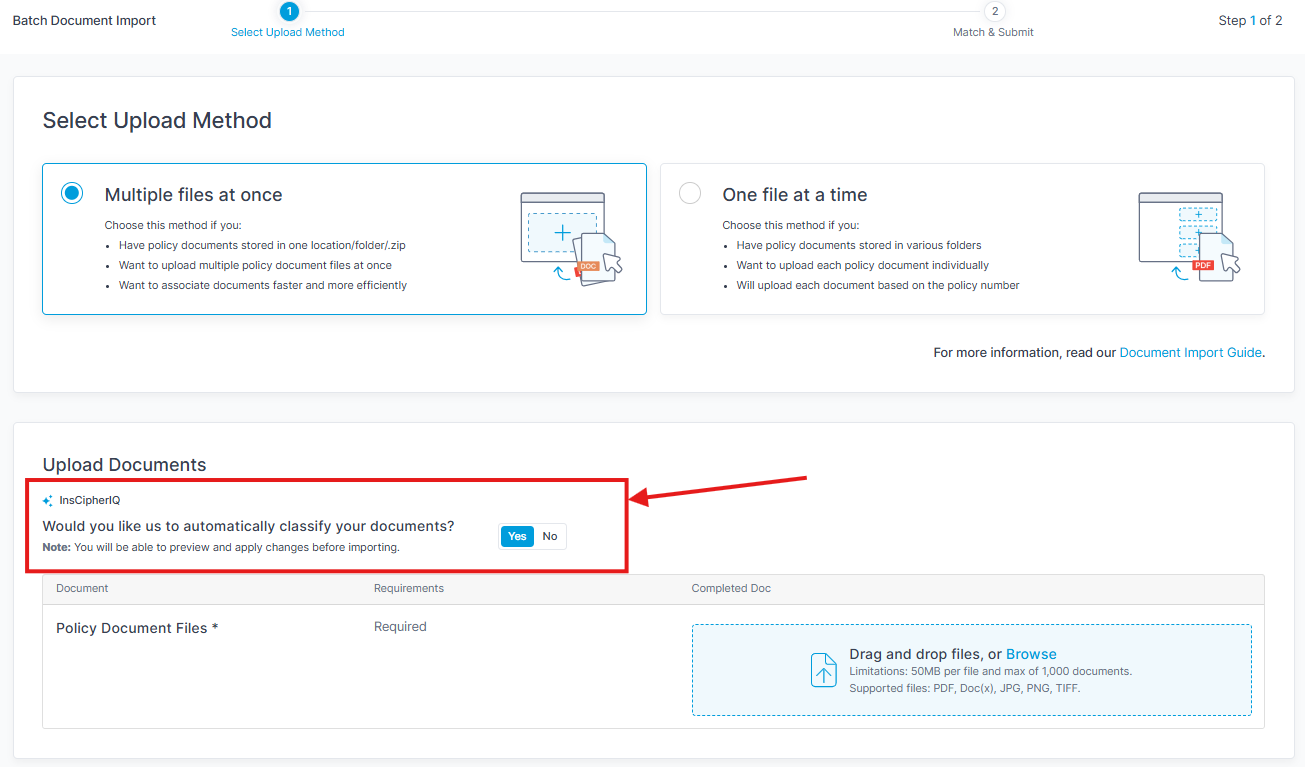
Once you've selected your choice of mapping, you will then upload the documents.
If you selected 'No' under the automatic classification toggle question
If you selected 'Yes' under the automatic classification toggle question
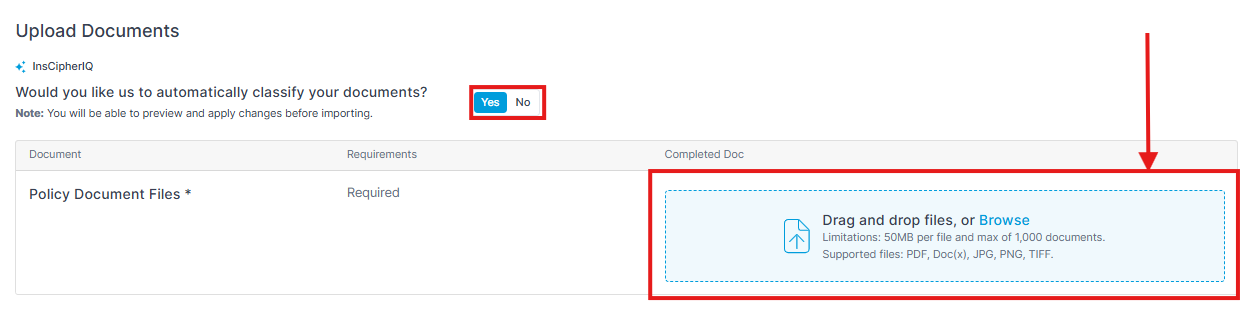
In this case, you've selected to allow InsCipher to map your documents to transactions for you.
First upload the files to the dropzone - then click the Continue to Match & Submit button when you are completed.
Should you choose this method in Step 1, you will be asked to attach one or more policy files as well as a mapping CSV file (which is optional). After you have attached the files, click "Continue" to go to step 2. The files will upload and the button will activate to allow you to proceed to the next step.
On the Match & Submit screen, you'll notice the progress bar animating across the top of your screen. This indicates that the mapping is occurring.
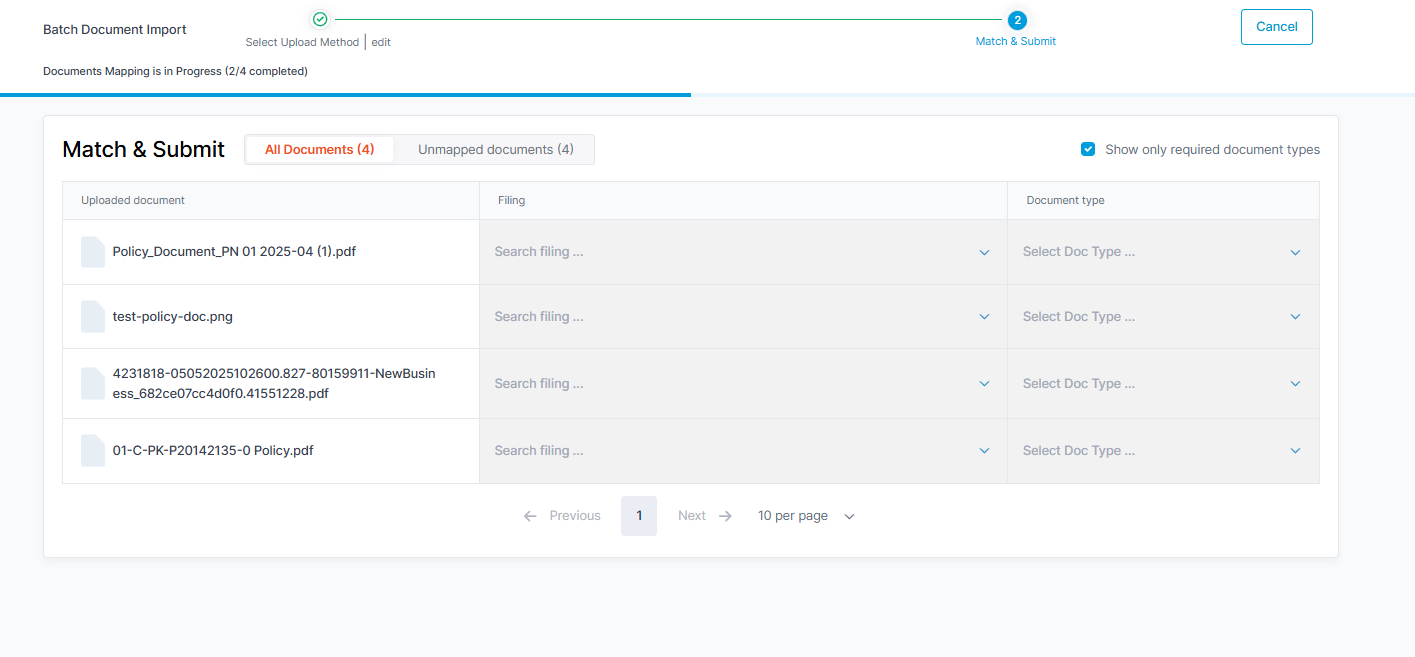
This can take anywhere from a few seconds to several minutes. If you need to, you can continue other work inside the app - and InsCipher will notify you once the mapping is completed.
Any errors or problems to address will appear on the top navbar of the Match & Submit section - outlining what filings failed and what were completed:
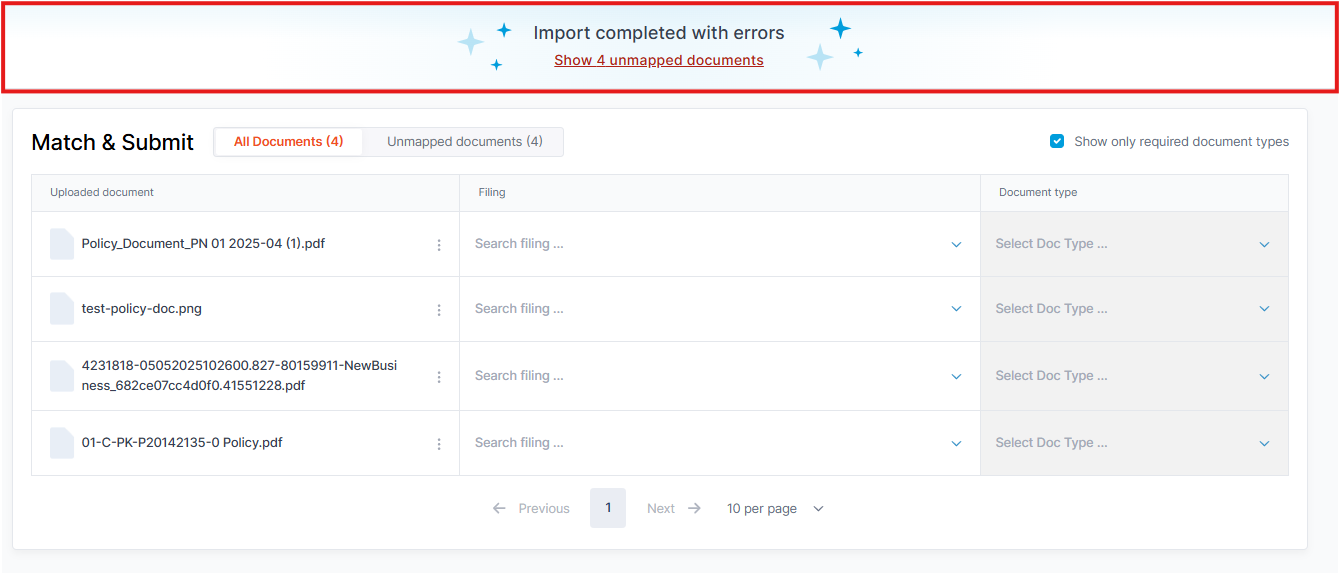
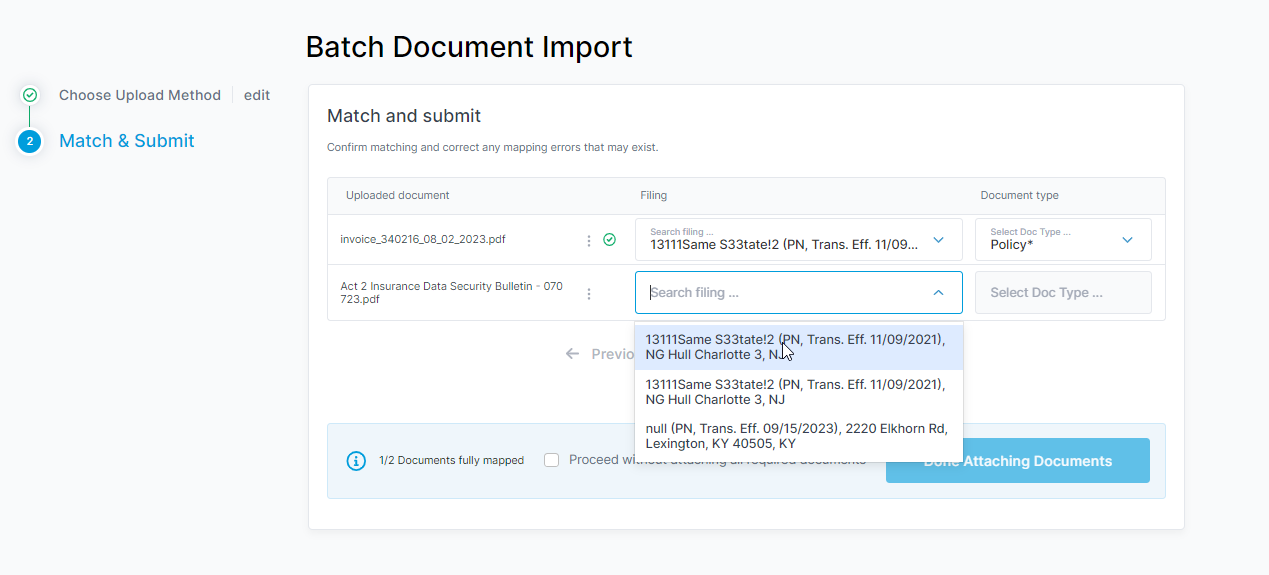
In the case that some documents were unmapped - this indicates that the system was not able to confidently assign the document that you uploaded to a transaction due to lack of information or some other issue. It is your job to review these use-cases, upload the correct documents that are missing or provide clearer information.
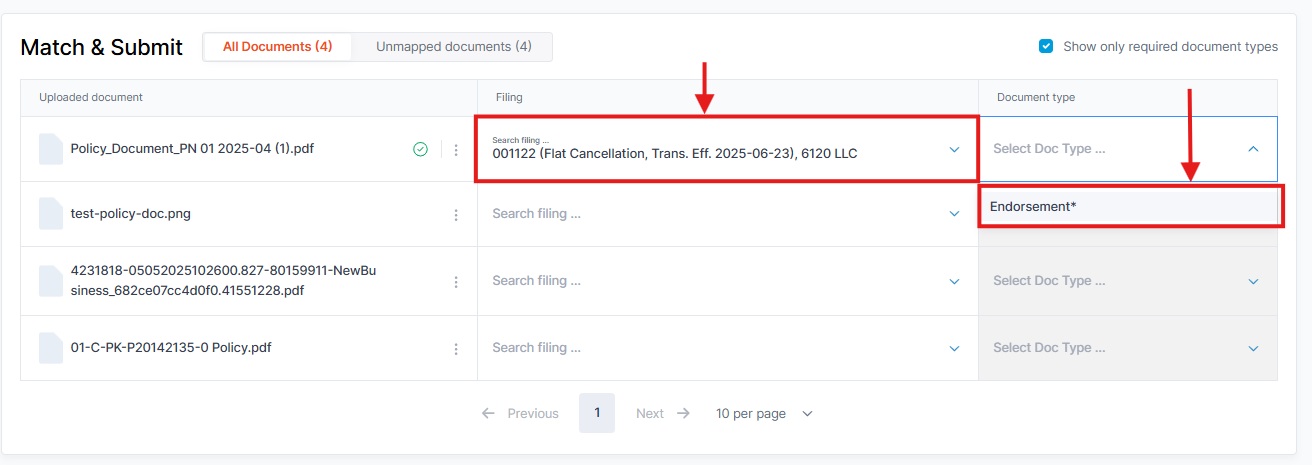
From here, you can also manually select a filing to assign the document to and define the document type.
Once you are ready to map (attach) all of the documents you've uploaded, it's time to click Finalize Document Mapping button. You will be greeted by a confirmation message asking you if you'd like to proceed and perform the action. You can click Confirm if you are ready to map the documents.
From there, you will be redirected back to the page you were on before the Document Import wizard. For example, if you'd started by selecting filings on the Filing List View, you'd be redirected back there. If you'd started by attaching documents in the Filing Import Log, you'd be routed to that page.
TIP:
- If you are trying to import more than 20 documents at a time, we recommend you consider using a CSV mapping file to make the process of mapping faster.
Required Headers
Header Name | Field Description |
|---|---|
invoice_number | "invoice_number" = used as a unique transaction ID from your policy management system when importing transactions. |
code | InsCipher's document code. Utah and Idaho users > View Documents import codes [here](https://lookerstudio.google.com/u/0/reporting/9b80f242-d698-4128-b457-e1875a7333b2/page/p_otc1uchjqc/edit). Filing Services® users > View Document Import codes [here](https://lookerstudio.google.com/u/0/reporting/0b499657-4b92-4336-9bb3-c3650692bcf9/page/p_otc1uchjqc/edit). Connect® users > View Document Import codes here. |
file | This is the exact file name, including the file extension., of the documents you are attaching in the first step. |
If using Excel to populate, the values will look like this:
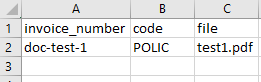
Sample CSV Document Mapping File
Step 2 of the Attach Mulitple Documents Method
Opposite to the single drag and drop approach, in Step 2 of this method, you will be mapping policies and document types to the already attached document files. Like the other methods, however, you don't have to complete the mapping on all files in order to save your progress.
Updated about 2 months ago